
Deploying WordPress can be a tricky job and usually takes several manual steps. Maybe you perfected your manual process, but mistakes are inevitable. Touching files directly via FTP or databases through phpMyAdmin can have severe consequences. Certain errors mean you have to start the process from scratch, increasing the possibility of downtime or even loss of data.
Automating the deployment has lot of advantages. The Twelve-Factor App details them perfectly. Especially Factor five, Build, release, run, explains the advantages very well.
Automated deployments should be reliable, consistent and repeatable. That takes away some risks and provides certain guarantees:
- Remove potential for human errors during deployment
- Consistency across environments
- Faster development cycle (less time is spend on deployments)
- Reduce potential downtime
- Catching errors before deployment
- Easily roll back to previous deploys
And not only that but automated deployments also help setting up a local development environment easily, and consistent with other environments.
Bedrock VS. vanilla WordPress
We highly recommend using Roots.io Bedrock instead of the usual way of using WordPress. Bedrock is a modern WordPress boilerplate that makes automated deployments and working locally way more easy, among a lot of other things.
Bedrock will be the focus in this article. But it’s not that different from using regular WordPress and we’ll try to highlight the differences throughout this article.
Just give me example code plz
We have two example repositories at the ready for you!
Vanilla WordPress
As said we recommend using the Bedrock WordPress setup as it is easier to deploy and manage configuration for different environments. But it is possible to use regular WordPress in a deployable setup. Check out our WordPress example repository on GitHub. You can still follow this article, we’ll explain the differences along the way.
Bedrock
The website your are reading this article on right now is using Bedrock! The main difference between regular WordPress and the Bedrock way is the folder structure and configuration. Our good old wp-config.php file is now split up allowing different configuration for different environments. Check out our Bedrock example repository on our GitHub account.
Preparing
If you’re not already familiar with automated deployment principles this might feel a bit new. There are a few steps to take to make sure deployments are reliable, consistent and repeatable. And we’ll cover most of them in this article.
- The WordPress site has a codebase on GitHub, Bitbucket or GitLab
- Have a developer workflow in place using branches. We wont cover strategies here but GitHub Flow is a good place to start.
- As part of the automated process the codebase should have build tools in place to install WordPress and all required plugins and/or themes In this case this would be Composer and WordPress Packagist.
- Sensitive data, like database credentials in
wp-config.php, shouldn’t be part of the repository
Setup & play around
Setup a local development environment if you haven’t already. You can use your own WordPress codebase or fork ours. If you already have a repository with Bedrock/WordPress you can move on to deploying on Forest.host.
We wont go into Bedrock here too much. Roots.io has excellent documentation and guides. But just to get started, here are a couple takeaways.
Where’s my wp-config.php at?
Configuration in Bedrock lives in the .env file and config/environments/ folder. Where every environment has it’s own configuration. As you can see in our example repository we have already added database credentials. Those are provided as environment variables for Forest.host. More on that later.
Where’s the themes folder?
All themes can be added to web/app/themes.
Adding plugins and themes
Roots.io has excellent guides on how to add plugins and themes with Composer and even on how to use commercial (pro) WordPress plugins.
Deploying on Forest.host
Now that we covered all theory, lets get our hands on actually deploying. Login to your Forest account and navigate to Create new project. (Don’t have an account? Get started here)
Give the project a nice name and proceed to the environment section.
Here you’ll need to provide a branch name. You can read more about that in our article on setting up an environment but basically the branch name refers to the branch name we want to deploy.
We could, for example, create an environment for master. Which will deploy every commit pushed to the master branch in our repository and we could do the same for staging. That way we can make changes, push it to staging, check if everything works well on Forest.host and from there merge staging into master to deploy the update for the whole world to see.
Blueprint
Scrolling down to the blueprint section we can use an existing blueprint for our site since Forest.host already offers blueprints for WordPress/Bedrock. Select the Bedrock on PHP x blueprint if using Bedrock, choose WordPress on PHP x if not using Bedrock.
Check out our article about blueprints if you want to know more.
In the right pane you’ll see the blueprint laid out. Pass the repository we want to deploy to the PHP service.
Use the yellow button on the bottom right saying go to edit mode to switch to edit mode. We are now in control over the blueprint and this allows us to set some specific options. As you’ll see a lot has been configured already. That’s one of the cool things blueprints offer. You can define an environment once and re-use it.
Remember one of the important requirements for automated deploys is that we can use build commands to go from our codebase to an application we can run.
Bedrock or vanilla WordPress, either way we want to have as a build command: composer install --no-interaction (the --no-interaction flag makes sure Composer wont ask a question and wait for user input during the build phase)
When not using Bedrock you’ll also need to change the deploy path. This refers to the directory in the repository we eventually want to deploy. For our WordPress example repository this would be: wordpress. Run composer install and you’ll quickly see why. Running this command results in a folder called wordpress containing a WordPress installation.
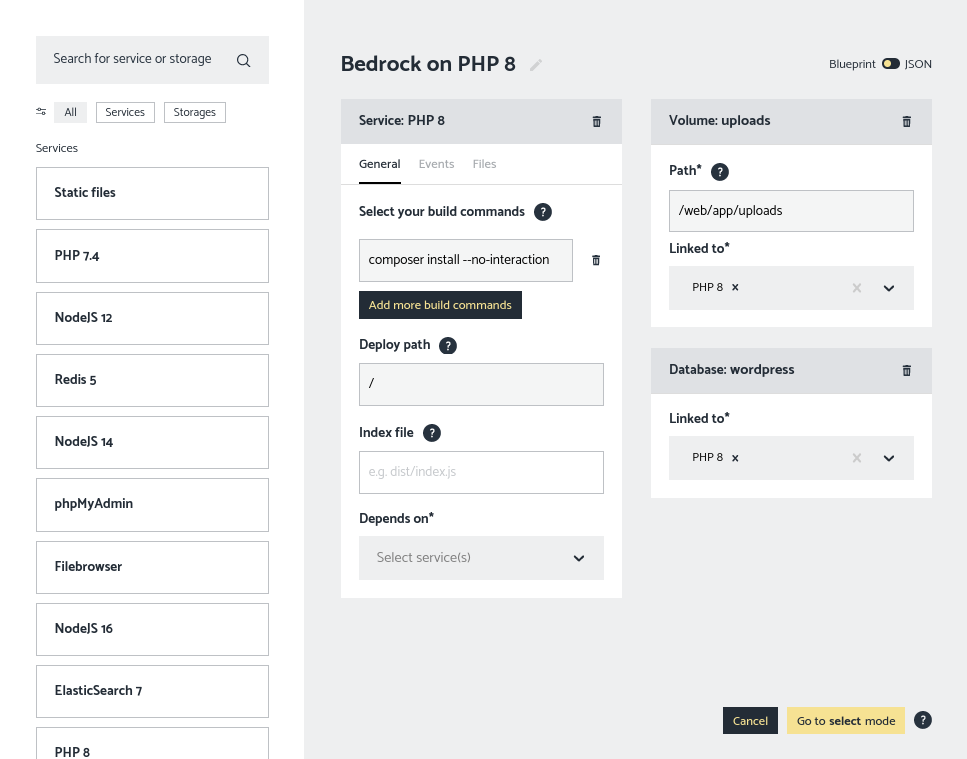
As you see here we have:
- PHP 8 – which runs the WordPress code
- Volume: uploads – that is storage for our uploads
- Database: wordpress – our database. Forest.host provides the credentials as environment variables, as mentioned earlier.
Saving this takes us to the environment overview where we get a summary of what we just configured.
Adding a domain
Before we go on and deploy we can add a domain. Without one our shiny new WordPress site wont be publicly available.
Make sure your domain has an A-record pointing to our servers at: 45.135.56.67.
If you are not sure, we have an article covering this as well.
Move to the domains tab. Here we’ll just need to add our domain and that’s it.

Deploy!
From this point on, triggering a build an deploy will happen fully automatically. All you need to do is push changes to the connected branch of the code’s repository and Forest.host will start working. Something along the lines of:
~ git commit -m "Awesome new feature X"
~ git push origin master
Which will result in Forest starting a build, which looks like this:

Here we can see the build passed (there’s a green check icon) and deployed (indicated by the green rocket).
Nice work, you can now visit your freshly installed WordPress site!
Multiple environments
One of the awesome advantages of the automated deployment workflow together with Forest.host is that it is very easy to have multiple environments. For example: you can setup a staging environment so you can view your changes before deploying them to master for the whole world to see.
When we use Bedrock we can define an environment with the environment variable WP_ENV. You can set this environment variable to staging in your Forest.host environment. That will make Bedrock load config/environment/staging.php as it’s “wp-config.php”, so to speak. We can define the domain and urls and other configuration specifically for this environment. You can read more about environment variables in this article.
What’s next?
Automating the deployment process means that you can focus on what you are best at: making awesome websites! Automating processes like deployments decrease the chance of errors, downtime. Save yourself, and your future self, time, money and stress.
Now that we have all this setup we can work on the actual project. We have a blueprint and repository with WordPress ready. For the next project we only need to fork the repository and we can re-use our blueprint.